
Chris Hillman
Sunday, May 18, 2025
Streamlining Data Pipeline Reliability: The Write-Audit-Publish Pattern
Introduction: Why Safe Data Pipelines Matter
In the world of data engineering, there’s a constant challenge we all face: how do we ensure our production data remains reliable and error-free when deploying updates? Anyone who’s experienced the cold sweat of a bad deployment affecting critical business data knows this pain all too well.
Enter the Write-Audit-Publish pattern—a robust approach that can significantly reduce the risk of data pipeline failures. This pattern, which shares DNA with the well-known Blue-Green deployment strategy from software engineering, creates a safety net that can save your team countless hours of troubleshooting and emergency fixes.
In this article, we’ll explore how the WAP pattern works, why it’s valuable, and I’ll share a practical implementation using Apache Airflow that you can adapt for your own data pipelines.
Understanding the Write-Audit-Publish Pattern
The WAP pattern is elegantly simple in concept, yet powerful in practice. It involves three distinct stages:
- Write: Create or generate the new data in a staging environment, separate from production.
- Audit: Verify the data integrity, completeness, and correctness through automated tests.
- Publish: Only after successful validation, move the data to production.
Here’s a visual representation of how the pattern works:
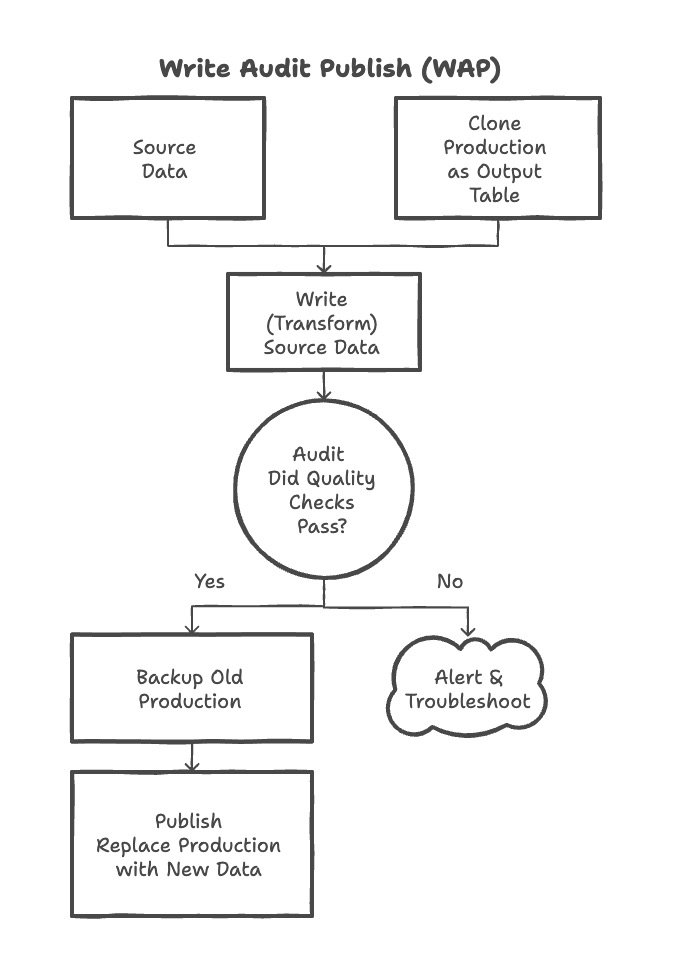
The beauty of this approach is that your production data remains untouched until you’ve confirmed that the new data meets your quality standards. This drastically reduces the risk of introducing bad data into your production environment.
When to Use the WAP Pattern
The WAP pattern is particularly valuable when:
- Your data pipelines feed critical business operations
- You have complex transformations that could potentially introduce errors
- You need to ensure downstream systems aren’t affected by bad data
- You’re working with high-volume data where manual verification isn’t feasible
- You want to implement continuous deployment for your data pipelines
While it adds some overhead to your pipeline process, the benefits in terms of reliability and reduced production incidents make it worthwhile for most data teams.
Implementing WAP in Apache Airflow
Let’s look at a practical implementation of the WAP pattern using Apache Airflow. The example below shows a reusable approach that can be applied to multiple tables in your data warehouse.
Core Components of the Implementation
Our Airflow DAG consists of several key components:
- A TaskGroup generator that creates the Write-Audit-Publish sequence for any given table
- Python functions handling each step of the process
- Proper error handling and logging throughout the pipeline
Here’s a simplified version of the core implementation:
import logging
from airflow import DAG
import pendulum
from airflow.operators.empty import EmptyOperator
from airflow.utils.task_group import TaskGroup
from airflow.operators.python import PythonOperator
from datetime import datetime, timedelta

# Setup your Airflow DAG
local_tz = pendulum.timezone("Australia/Melbourne")

with DAG(
    dag_id="wap_pattern_example",
    description="Write-Audit-Publish Pattern Example",
    start_date=pendulum.datetime(year=2025, month=5, day=18, tz=local_tz),
    schedule_interval=None,
    catchup=False,
    is_paused_upon_creation=True,
    max_active_runs=1,
    tags=["WAP", "DataQuality"],
    default_args={
        "retries": 3,
        "retry_delay": timedelta(minutes=3),
        'depends_on_past': True,
        'wait_for_downstream': False
    }
) as dag:

    # Define start and end points
    start = EmptyOperator(task_id="start")
    end = EmptyOperator(task_id="end")

    def write_table(output_table, production_table):
        """Create a copy of the production table in a staging environment"""
        # Your database-specific implementation here
        logging.info(f"Creating staging table {output_table}")
        # Example implementation:
        execute_query(f"DROP TABLE IF EXISTS {output_table}")
        execute_query(f"CREATE TABLE {output_table} AS SELECT * FROM {production_table}")

    def audit_table(output_table, production_table):
        """Run data quality checks on the staging table"""
        logging.info(f"Starting audit for tables: {production_table} and {output_table}")

        # Example check: Verify row counts match
        prod_count_query = f"SELECT COUNT(*) FROM {production_table}"
        output_count_query = f"SELECT COUNT(*) FROM {output_table}"

        prod_count_result = execute_query(prod_count_query)
        output_count_result = execute_query(output_count_query)

        # Extract row count values
        prod_count = prod_count_result[0][0]  # First row, first column
        output_count = output_count_result[0][0]  # First row, first column

        if prod_count != output_count:
            logging.error(f"AUDIT FAILED! Row count mismatch: {production_table}={prod_count}, {output_table}={output_count}")
            raise ValueError(f"AUDIT FAILED! Row count mismatch: {production_table}={prod_count}, {output_table}={output_count}")

        # Add additional data quality checks here
        # For example: null checks, data type validation, business rule validation

        logging.info(f"AUDIT PASSED: {production_table} ({prod_count} rows) matches {output_table} ({output_count} rows).")

    def publish_table(output_table, production_table):
        """Move data from staging to production with backup"""
        # Get current date in YYYYMMDD format
        current_date = datetime.now().strftime("%Y%m%d")

        # Extract the base table name from production_table
        table_name = production_table.split('"')[-2]

        # Create backup of current production table
        backup_table = f'"schema"."backup"."{table_name}_BKUP_{current_date}"'
        logging.info(f"Backing up {production_table} to {backup_table}")

        execute_query(f"DROP TABLE IF EXISTS {backup_table}")
        execute_query(f"CREATE TABLE {backup_table} AS SELECT * FROM {production_table}")

        # Move output table to production
        execute_query(f"DROP TABLE IF EXISTS {production_table}")
        execute_query(f"CREATE TABLE {production_table} AS SELECT * FROM {output_table}")
        execute_query(f"DROP TABLE IF EXISTS {output_table}")

        logging.info(f"Published {output_table} as {production_table}")

    def create_wap_task_group(table_name):
        """Creates a TaskGroup for the Write-Audit-Publish process for a given table."""

        OUTPUT_TABLE = f'"schema"."staging"."{table_name}_output"'
        PRODUCTION_TABLE = f'"schema"."production"."{table_name}"'

        with TaskGroup(group_id=f"{table_name}_wap") as wap_group:

            # Step 1: Write Task
            write_task = PythonOperator(
                task_id=f"write_{table_name}",
                python_callable=write_table,
                op_kwargs={
                    "output_table": OUTPUT_TABLE,
                    "production_table": PRODUCTION_TABLE
                }
            )

            # Step 2: Audit Task
            audit_task = PythonOperator(
                task_id=f"audit_{table_name}",
                python_callable=audit_table,
                op_kwargs={
                    "output_table": OUTPUT_TABLE,
                    "production_table": PRODUCTION_TABLE
                }
            )

            # Step 3: Publish Task
            publish_task = PythonOperator(
                task_id=f"publish_{table_name}",
                python_callable=publish_table,
                op_kwargs={
                    "output_table": OUTPUT_TABLE,
                    "production_table": PRODUCTION_TABLE
                }
            )

            # Define dependencies within the group
            write_task >> audit_task >> publish_task

        return wap_group

    # Create WAP Task Groups for multiple tables
    customer_wap = create_wap_task_group("dim_customer")
    orders_wap = create_wap_task_group("fct_orders")

    # Define overall DAG structure
    start >> [customer_wap, orders_wap] >> end
This implementation provides a reusable framework for applying the WAP pattern to any table in your data warehouse. You can extend the audit step with additional data quality checks specific to your business requirements.
Key Implementation Details
The Write Step
The write step creates a copy of the production data in a staging environment. This allows us to work with the data without affecting production. In our implementation, we’re creating a new table with the same structure and data as the production table.
def write_table(output_table, production_table):
    execute_query(f"DROP TABLE IF EXISTS {output_table}")
    execute_query(f"CREATE TABLE {output_table} AS SELECT * FROM {production_table}")
Depending on your specific requirements, you might:
- Apply transformations to the data
- Merge multiple data sources
- Enrich the data with additional information
- Run your dbt models to generate the output
The Audit Step
The audit step is where we verify the quality of our data before it goes to production. In our example, we’re doing a simple row count check, but in practice, you’d want to implement more comprehensive tests:
def audit_table(output_table, production_table):
    # Basic row count check
    prod_count_query = f"SELECT COUNT(*) FROM {production_table}"
    output_count_query = f"SELECT COUNT(*) FROM {output_table}"

    prod_count_result = execute_query(prod_count_query)
    output_count_result = execute_query(output_count_query)

    prod_count = prod_count_result[0][0]
    output_count = output_count_result[0][0]

    if prod_count != output_count:
        raise ValueError(f"AUDIT FAILED! Row count mismatch")
Here are some additional audit checks you might want to implement:
- Column-level validation: Check data types, ranges, and constraints
- Business rule validation: Ensure the data meets specific business requirements
- Anomaly detection: Identify unusual patterns or outliers
- Referential integrity: Verify relationships between tables
- Completeness checks: Ensure all expected data is present
If you’re using dbt, you can leverage its testing framework to run detailed tests on your models before promoting them to production.
The Publish Step
The publish step is where we move the validated data to production. A key aspect of our implementation is creating a backup of the current production data before replacing it:
def publish_table(output_table, production_table):
    # Backup current production
    current_date = datetime.now().strftime("%Y%m%d")
    backup_table = f'"schema"."backup"."{table_name}_BKUP_{current_date}"'

    execute_query(f"DROP TABLE IF EXISTS {backup_table}")
    execute_query(f"CREATE TABLE {backup_table} AS SELECT * FROM {production_table}")

    # Replace production with new data
    execute_query(f"DROP TABLE IF EXISTS {production_table}")
    execute_query(f"CREATE TABLE {production_table} AS SELECT * FROM {output_table}")
This backup provides an additional safety net, allowing you to quickly restore the previous state if issues are discovered after deployment.
Advanced WAP Patterns
While the basic WAP pattern provides significant benefits, there are several advanced variations you can implement for additional robustness:
Incremental WAP
Instead of processing the entire dataset, you can implement an incremental approach that only processes new or changed data:
def write_incremental(output_table, production_table, incremental_key, last_run_date):
    """Create a staging table with only new or changed data"""
    execute_query(f"""
        CREATE TABLE IF NOT EXISTS {output_table} AS
        SELECT * FROM {production_table}
        WHERE {incremental_key} > '{last_run_date}'
    """)
This approach is particularly valuable for large datasets where processing the entire dataset would be time-consuming and resource-intensive.
Parallel WAP
For complex data pipelines with multiple interdependent tables, you can implement a parallel WAP pattern where multiple tables are processed simultaneously
This approach can significantly reduce the overall execution time of your pipeline while maintaining the safety benefits of the WAP pattern.
Validation-Heavy WAP
For critical data where accuracy is paramount, you can implement a validation-heavy WAP pattern with multiple layers of checks:
- Schema validation: Ensure the table structure matches expectations
- Data type validation: Verify data types for each column
- Data quality validation: Check for nulls, duplicates, and other quality issues
- Business rule validation: Ensure business-specific rules are met
- Cross-table validation: Verify relationships between tables
- Historical trend validation: Compare with historical data to detect anomalies
Integration with Modern Data Stack Tools
The WAP pattern can be integrated with various tools in the modern data stack:
dbt Integration
If you’re using dbt for your transformations, you can implement the WAP pattern by:
- Using dbt to create your models in a staging schema
- Running dbt tests to validate the models
- Using a custom operation to move the validated models to production
def dbt_wap_process():
    # Run dbt models in staging
    subprocess.run(["dbt", "run", "--target", "staging"])

    # Run dbt tests
    test_result = subprocess.run(["dbt", "test", "--target", "staging"])

    # If tests pass, promote to production
    if test_result.returncode == 0:
        subprocess.run(["dbt", "run", "--target", "production"])
Great Expectations Integration
If you’re using Great Expectations for data quality, you can integrate it into the audit step:
def audit_with_great_expectations(output_table):
    context = ge.data_context.DataContext()
    batch = context.get_batch({
        "datasource": "warehouse",
        "table": output_table
    })

    results = context.run_validation(
        batch,
        "my_expectation_suite"
    )

    if not results["success"]:
        raise ValueError("Data quality validation failed")
Best Practices for Implementing WAP
Based on my experience implementing the WAP pattern, here are some best practices to consider:
1. Make Audits Comprehensive
Your audit step is the gatekeeper that prevents bad data from reaching production. Make it as comprehensive as possible:
- Validate data structure (schema, data types)
- Check data quality (nulls, duplicates, outliers)
- Verify business rules and constraints
- Compare with historical data for anomalies
2. Implement Proper Error Handling
Ensure your implementation has robust error handling and clear logging:
try:
    # Run audit checks
    audit_table(output_table, production_table)
except Exception as e:
    logging.error(f"Audit failed: {str(e)}")
    # Send alerts to appropriate channels
    send_alert(f"WAP process failed during audit: {str(e)}")
    raise
3. Create Meaningful Backups
Always create backups before publishing to production:
- Include timestamps in backup table names
- Consider keeping multiple historical backups
- Implement a cleanup policy to manage backup storage
4. Monitor Pipeline Performance
Track the performance of your WAP pipeline to identify bottlenecks:
- Monitor execution time for each step
- Track resource usage (memory, CPU)
- Identify slow-running queries or operations
5. Implement Alerting
Set up alerts to notify when issues occur:
- Alert on audit failures
- Alert on performance degradation
- Alert on unexpected data patterns
Conclusion: Building Resilient Data Pipelines
The Write-Audit-Publish pattern provides a robust framework for building resilient data pipelines that protect your production data from errors. By implementing this pattern in Apache Airflow, you can create a systematic approach to data validation and deployment that scales across your data warehouse.
The investment in setting up a WAP pipeline pays dividends in reduced production incidents, improved data quality, and increased confidence in your data systems. As data continues to drive critical business decisions, implementing patterns like WAP becomes essential for maintaining trust in our data infrastructure.